SkiErg | Concept2

SkiErg

Einführung in die Luftklappeneinstellung

Die Luftklappeneinstellung ist...

SkiErg Damper
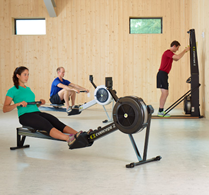
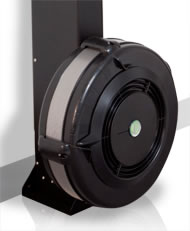
Die Luftklappe ist der Hebel an der Seite der Windradverkleidung, womit Sie die Luftzufuhr zum Windradgehäuse steuern können. Die Windradverkleidung beim SkiErg ist mit einer nummerierten 10 stufigen Skala versehen, mit der Sie die Luftklappeneinstellung entsprechend justieren können.

  • Je höher die Zahl, umso höher ist auch die Luftzufuhr zum Windradgehäuse. Je höher die Luftzufuhr, umso mehr Widerstand

    erzeugt das Windrad. Das Windrad wird bei jedem Schlag auch stärker abgebremst, was zu einem höheren Widerstand am Anfang des Durchzuges führt.
  • Je niedriger die Zahl, umso geringer ist sowohl die Luftzufuhr, als auch der Widerstand.

Die Luftklappeneinstellung ist wie die Gangschaltung eines Fahrrades; sie lässt den Widerstand zwar unterschiedlich wirken, wirkt sich aber auf den tatsächlichen Widerstand nicht aus. Eine niedrige Luftklappeneinstellung ist vergleichbar mit einem leichten Gang beim Fahrradfahren.

Die Lufklappeneinstellung ist nicht...

Viele Athleten verwechseln die Luftklappeneinstellung mit der Intensität oder dem Widerstand. Die Intensität Ihres Trainings hängt von Ihrem eigenen Krafteinsatz ab; je härter Sie ziehen, desto intensiver wird das Training. Dies ist unabhängig von der Luftklappeneinstellung. Der Widerstand beim SkiErg wird vom Luftwiderstand und nicht von der Luftzufuhr erzeugt. Je schneller sich das Windrad dreht, desto höher wird der Widerstand.

Beim Langlaufen ist es auch nicht anders; Sie selbst können die Intensität bestimmen, in dem Sie schneller oder langsamer fahren. Je nach dem wie die Bedingungen sind, wird es leichter oder schwerer sein schnell zu fahren. Der Unterschied liegt darin, wie es sich anfühlt die Skier zu beschleunigen. Bei einem Rennski müssen Sie Ihre Kraft schneller übertragen, um schneller zu fahren. Bei einem schlecht gewachsten Ski, benötigen Sie ebenfalls mehr Kraft, um schneller fahren zu können. Beim langsamen Ski wird Ihre Kraft aber langsamer übertragen als beim schnellen Rennski.

Bei einer Luftklappeneinstellung von 1 bis 4, erzeugt der SkiErg ein ähnliches Gefühl wie beim Langlaufen mit einem schnellen Rennski. Bei einer höheren Luftklappeneinstellung, haben Sie das Gefühl mit einem schweren langsamen Ski unterwegs zu sein. Unabhängig von der Luftklappeneinstellung, müssen Sie Ihren Krafteinsatz erhöhen, um eine höhere Intensität zu erzeugen.

Drag-Faktor: Wie der tatsächliche Kraftaufwand berechnet wird.

Man könnte meinen, dass sich die besten Ergebnisse mit der höchsten Luftklappeneinstellung erreichen lassen. Erst sollte man aber mehr über die Rolle des Performance Monitors (PM) wissen.

Der PM misst, wie viel die Drehung des Windrades zwischen jedem Zug verzögert wird und berechnet hierbei, wie schnell oder langsam die "Bedingungen" sind. Diese Verzögerungsrate wird als Drag-Faktor bezeichnet. Bei Ihrem nächsten Zug wendet der PM den Drag-Faktor bei der Windradgeschwindigkeit an, um Ihren tatsächlichen Kraftaufwand unabhängig von der Luftklappeneinstellung zu berechnen. Ohne diese Selbstkalibrierung wäre es nicht möglich, die Ergebnisse von verschiedenen SkiErgs zu vergleichen, um damit SkiErg-Rennen zu veranstalten oder Weltranglisten zu erzeugen.

Der DragFaktor kann von SkiErg zu SkiErg abweichen. Eine Luftklappeneinstellung von 3 bei Ihrem Gerät zu Hause kann sich anfühlen wie eine von 4 bei dem Gerät im Fitnessclub. Der Dragfaktor kann durch die Lufttemperatur, Höhe und sogar die Verunreinigung des Windradgehäuses beeinflusst werden. Bei unterschiedlichen SkiErgs werden Sie die Luftklappeneinstellung vielleicht justieren müssen, um den gewünschten Drag-Faktor zu erreichen. Siehe Drag-Faktor anzeigen für weitere Informationen zur Überprüfung des Drag Faktors bei Ihrem SkiErg.

Welche Luftklappeneinstellung Sie verwenden sollten

Mit ein wenig Experimentieren können Sie die Luftklappeneinstellung und den Drag-Faktor finden, die am besten zu Ihnen passen. Wir empfehlen Ihnen Ihr Training bei einer Luftklappeneinstellung von 3 oder niedriger zu beginnen. Sie sollten der Versuchung widerstehen, eine zu hohe Luftklappeneinstellung zu wählen, denn so ermüden Ihre Muskeln schneller, was ein optimales Herz-Kreislauf-Training unmöglich macht. Der Performance Monitor bietet Ihnen eine unmittelbare und präzise Messung Ihrer Leistungsdaten bei jedem Schlag und ermöglicht Ihnen damit sowohl die Überwachung Ihrer Leistung, als auch die Optimierung Ihres Trainings.

Durch Verstellung der Luftklappeneinstellung können Sie unterschiedliche Trainingseinheiten gestalten. Eine niedrige Luftklappeneinstellung passt generell besser zum aeroben Training, wobei eine höhere Luftklappeneinstellung sich für Krafttraining am besten eignet.

Beanspruchte Muskulatur

Langlauf und deine Muskeln

Langlauf ist eine koordinierte Bewegung der Muskeln, welche die grossen Muskelgruppen alle involviert. Die folgenden Abschnitte veranschaulichen die primären Muskeln, die bei jeder Bewegung des Skizugs verwendet werden. Sowohl die primären (rot) als auch die sekundären Muskeln (gelb) arbeiten synchron zusammen, um die Bewegung auszuführen, jedoch mit unterschiedlichem Grad an Beteiligung und Leistungsabgabe. Beachten Sie Folgendes oder schauen sie die entsprechende SkiErg Muskelbeanspruchungsübersucht an.

1 Der Start

  • Primärmuskeln: Trizeps, Trapezius, Lats, Waden
  • Sekundärmuskeln: Bauchmuskeln, Rückenstrecker, Gesäßmuskeln, Kniesehnen, Hüftbeuger, Quads und Schienbeine
Der Start

2 Der Zug

  • Primärmuskeln: Trizeps, Lats, Bauchmuskeln, Hüftbeuger, Schienbein
  • Sekundärmuskeln: Quads, Rückenstrecker, Gesäßmuskeln, Kniesehnen, Waden
The Pull

3 Das Ende

  • Primärmuskeln: Trizeps, Bauchmuskeln, Hüftbeuger, Schienbein
  • Sekundärmuskeln: Quads, Rückenstrecker, Gesäßmuskeln, Kniesehnen, Waden
The Finish

4 Die Umkehr

  • Primäre Muskeln: Quads, Gesäßmuskeln, Kniesehnen, Rückenstrecker, Deltamuskel-Vorderteil, Trapez-Oberteil, Pectoralis-Oberteil, Waden
  • Sekundärmuskeln: Bauchmuskeln, Schienbein, Hüftbeuger
The Return

As The Flywheel Spins: A Concept2 Workout Podcast

Join Concept2 trainer Cady Hart-Petterssen in guided podcast workouts for the Concept2 RowErg, BikeErg and SkiErg. Cady will lead you through invigorating workouts to help you strengthen and condition. The podcast provides great motivation to row, ski or bike more—the time flies by as your flywheel spins! Download the podcast to your smartphone to follow along. Suitable for all levels looking for rowing machine workouts and more.

Available On:

What is Biathlon?

The nordic sport of Biathlon is a combination of fast-paced Nordic skiing and accurate target-shooting. Either one by itself is challenging enough—put them together and it almost seems impossible. Visualize yourself finishing a tough, hilly 2–3k lap of skiing, coming into the shooting range with heart and lungs working, and having to steady yourself enough to hit five targets at a distance of 50 meters! It’s a terrific sport!

Although Biathlon is not a common pastime in the U.S., it is hugely popular in Europe. It’s not uncommon to have over 25,000 fans present at a World championship event, and it’s sure to be televised and viewed by additional millions throughout Europe as well. The combination of two different events—skiing and shooting—adds to the unpredictability of the race outcome and therefore the excitement, suspense, speculation and potential for surprise!

Biathletes at the international level are amazingly consistent, accurate and fast—but they can still have bad days, while less consistent biathletes can have some very good days. In addition, the outcome of a race can change in less than a minute of shooting: each miss requires a penalty lap to be skied (or in the Individual event, a stiff time assessment), which can instantly shift competitors’ standings. Clean shooting can rapidly propel an athlete toward the front of the pack, while misses have the opposite effect. Some of the most consistent high performers are those who shoot well and also ski fast enough that even if they miss a few shots, they can still stay near the top.

Training for Biathlon ends up being a fairly time-consuming venture. Biathletes need to invest the same significant number of hours as regular Nordic skiers into physical training, and they also have to spend a lot of time shooting. A certain number of workouts are done as “combos” of shooting and hard physical effort; other times the shooting is done as “slowfire” where the focus is shooting position and technique, leaving the hard physical exertion to a separate workout.

Once you’ve tried biathlon, it tends to keep you coming back. There’s an irresistible urge to try again, and again, always hoping that you’ll hit more targets the next time.

Bringing It Indoors for Fun
Luckily, the fun and challenge of biathlon doesn’t require rifles and a shooting range. You can get a feel for the sport and reap its benefits using any aerobic exercise and a variety of “target” games—all of which can be done indoors. The SkiErg offers the closest simulation of skiing; but you can also use rowing, or other aerobic activity. For the shooting portion you can substitute a bean bag toss, throwing a ball through a hanging ring, shooting hoops, a laser gun—or for warm days a squirt gun! For the penalty, you can use a penalty lap of additional skiing—or any other challenge you like, such as pushups or pullups.

Biathlon on the Performance Monitor
The Performance Monitor stores interval time, range time and total elapsed time for all workouts. The biathlon function on the monitor allow you to ski intervals alternating with target shooting.

The Biathlon function allows you to:

  • choose the number of intervals you want (from 2 to 15)
  • choose the interval length
  • choose your penalty lap distance (from 50m to 250m in 50m increments) or choose no penalty

Note: If no penalty distance is selected, you will simply have an undefined rest time of up to 10 minutes between your intervals. You can use this for another form of “penalty” if you wish, such as pushups or whatever you need to practice the most!

Suggested Workouts Using Undefined Rest/Biathlon
First, decide what you will use for the target/accuracy aspect of this workout. In real biathlon, you shoot at five targets at a distance of 50 meters and you face a penalty for each one you miss.
Here are a few suggestions:

  • Toss five bean bags or balls at a bucket or box.
  • Set up five plastic bottles and “bowl” at them with a soft ball.
  • If you have a dart board or a basketball hoop near your erg, take five throws.

Second, set up your intervals. Real biathlon races consist of either 3 intervals with 2 shooting stages; or 5 intervals with 4 shooting stages. We suggest that you try five intervals, so you get to “shoot” four times. Here’s how to set up your PM:

  1. On the Main Menu, choose Select Workout > New Workout > Special > Biathlon.
  2. The screen will display the default setting of 500m distance and 3 intervals. Leave the 500m (or use the +/- button to change the distance if you prefer).
  3. Press the right arrow until “Number of intervals” is blinking on the screen. Use the + button to increase to 5 intervals.
  4. Press the right arrow until “Optional Penalty” is displayed, then use the + button to choose the penalty distance. We suggest 100 meters.
  5. Press the checkbox to complete your set-up. You are now ready to begin your biathlon workout.

Notes:

  • Only PM3s running PM3 Firmware Version 303 or higher include Biathlon.
  • On PM3s and PM4s, the menu path for setting up a Biathlon starts at the Main Menu and is Games > More Games > Biathlon.
  • The SkiErg is more authentic for biathlon, but rowing is fine, too!

Ski (or row) until the monitor prompts you to stop. This is when you “shoot.” After shooting, return to the PM and press the button for the number of penalties you incurred (the number of “shots” you missed. Then select Continue and resume skiing. Repeat until you have shot 4 times and completed all 5 intervals of skiing. Record your time, so you can try to beat it the next time!

Read more details about the Biathlon setting on the Performance Monitor.

Following Biathlon around the World
If you’re interested in following international Biathlon, a good place to start is the website of the International Biathlon Union (IBU): www.biathlonworld.com. Here you’ll find stories, videos, race schedules—and once competition begins in November—live results!

Combined Workouts with the Indoor Rower and SkiErg

As an increasing number of individuals and facilities now have both a Concept2 Indoor Rower and a SkiErg, we have been asked how the two pieces of equipment can be used together in one workout.

What are the benefits of a mixed-erg workout?

  • Balances your opposing muscles. Rowing opens at the hip while skiing closes at the hip.
  • Alternates muscle groups. Resting different muscles can allow for longer workouts.
  • Adds variety. Work in different positions, such as seated vs. standing.
  • Equipment can be shared. Join a partner and workout together.

Workout Ideas

Before trying these workouts, please read our liability disclaimer.

Swapping Equal Intervals

Alternate a 4-minute row with a 4-minute ski, with 1–3 minutes of rest in between. Your work intensity should be just under your maximum effort. Repeat for a total of 4 to 8 pieces.

Note: Shorter rest will shift the workout’s focus toward endurance; longer rest will shift it toward maximum power development.

PM Setting Tip: Set up intervals of 4 minutes work with undefined rest time on both machines.

For variety: The piece can be any time or distance you like.

Rotating through a Step-Down Workout

This is one of our favorites! Step down from 10 minutes to 9 minutes, and so on, down to 1 minute, alternating from rowing to skiing. As the pieces get shorter, increase the intensity. Total time: 55 minutes. Rest time is just the length of time it takes you to get from one machine to the other, though you can add a longer rest if desired.

For Variety: This could also be done as a pyramid, from 1 minute up to 6 minutes and back down. Or you could use distance rather than time for the steps. For example: 2000m ski, 1750m row, 1500m ski, and so on.

Long Pieces/Back and Forth

Warm up on the SkiErg for 5 minutes (minimum). Switch to the indoor rower for a 15 minute row; paddle easily for 5 minutes; switch back to the SkiErg for a 15 minute ski; then a 5 minute cool-down on the indoor rower. If you prefer to measure your workout in distance rather than time, do half the distance on each machine. For example, for a 10k workout, do 5k on the indoor rower and another 5k on the SkiErg.

For Variety: The work pieces may be shortened or lengthened.

Partner Workouts

Most of the above workouts can work with a partner—one skis while the other rows.

Recovery/Cool-down

Switching to “the other erg” can be a welcome change of pace for the cool-down after a hard workout. Plus, it’s a good way to add some muscular balance to your workout.

Muscles Used

Skiing and Your Muscles

Skiing is a coordinated muscle action that involves every large muscle group in the body. The following sections illustrate the primary muscles used during each movement of the skiing pull. Both the primary (red) and secondary muscles (yellow) work together in a synchronized fashion to accomplish the movement but with different levels of involvement and power output. Refer to the following or see SkiErg Muscles Used.

1 The Start

  • Primary muscles: triceps, trapezius, lats, calves
  • Secondary muscles: abs, back extensors, glutes, hamstrings, hip flexors, quads and shins
The Start

2 The Pull

  • Primary muscles: triceps, lats, abdominal muscles, hip flexors, shins
  • Secondary muscles: quads, back extensors, glutes, hamstrings, calves
The Pull

3 The Finish

  • Primary muscles: triceps, abdominal muscles, hip flexors, shins
  • Secondary muscles: quads, back extensors, glutes, hamstrings, calves
The Finish

4 The Return

  • Primary muscles: quads, glutes, hamstrings, back extensors, deltoid front part, trapezius upper part, pectoralis upper part, calves
  • Secondary muscles: abdominals, shins, hip flexors
The Return

Interval Training

What are Intervals?

An interval workout consists of bouts of high intensity work alternating with periods of lower intensity or rest. By varying the length of the work interval and the length of the rest interval, a wide variety of workouts can be designed to achieve a range of goals. Here are some common questions about intervals

Interval Q and A

Q. Intervals are only important for competitive athletes, right?
A. Wrong!

It is true that intervals are an important training component for anyone preparing for competition.

They help you:

  • Learn to compete with greater intensity.
  • Build the time that you can maintain a certain level of intensity.
  • Improve your speed of recovery.
  • Develop your body’s ability to switch between energy systems.

And they are a very time-efficient method of achieving all these goals. But recent research is showing that intervals are not just for competitive athletes.

Q. Can intervals help me lose weight and maintain health?
A. Yes. Research suggests that interval training may be a very time-efficient and effective way to lose weight, not to mention that it will build your fitness as effectively as longer, moderate workouts.

A study in Japan reached the intriguing conclusion that you would burn more fat with two 30 minutes bouts of exercise separated by a 20 minute rest period than in a single 60 minute session.

And finally, intervals add variety and structure to your workouts, which makes them even more interesting and helps the time pass.

Q. Why are intervals good for older athletes?
A. They have been shown to be the most effective workout for stemming the tide of aging.

A pilot study in Norway has shown that interval workouts may be more effective than longer, lower intensity workouts for reducing cholesterol, adjusting the ratio of fatty acids in the blood, and reducing the risk factors for metabolic syndrome. They have also been shown to be an effective therapy for patients with heart failure. Consult with your physician before starting an exercise program.

Q. Then why not do them all the time?
A. Because you can’t. Expect to be tired after doing intervals. If you’re not, you’re not doing them hard enough. You need to allow your body to recover for a day or two after interval sessions. Competitive athletes might do intervals as many as five days per week during a high-intensity speed training week; older athletes can generally do intervals up to 2–3 times per week.

Q. What should I know before I get started?
A. Warm up well.

The reason intervals are so effective is that they are intense. By working intensely, even for a short period of time, you place a greater demand on your heart and lungs, which in turn provides a stronger stimulus for physiological change. If all of your exercise is at the same moderate level, it will still burn Calories, but it won’t inspire your body to make changes. In order to work at a higher intensity, it is even more important warm-up well and be sure you are using proper technique. We recommend at least 10 minutes of warm-up.

Favorite Intervals from Concept2

Before trying these workouts, please read our liability disclaimer.

Meredith, Concept2 Team: Marketing

Favorite interval workout: Pyramid intervals. Start with 100m, then 200m, then 300m on up to 1000m and then back down, with 1 minute rest in between. It will take approximately one hour.
Variations: Shorten the workout by lowering the top of the pyramid.
Benefits: Pyramid intervals keep the workout interesting, and on the way back down it’s psychologically easier at high intensity because the intervals are getting shorter!

Dick, Concept2 Team: Engineering (and co-founder)

Favorite interval workout: 30 seconds of rest every 3 minutes. Pre-set the PM for a 2:30 work interval and a 0:30 rest interval. Aim for 30 minutes total time (10 work intervals).
Variations: Make the intervals a little easier but shorten the rest to 20 seconds. You can also choose to do either fewer intervals, or more!
Benefits: The short breaks allow you a brief mental and physical recovery without letting the heart rate drop very much. The end result is a sustained high quality aerobic workout.

Bruce, Concept2 Team: Leadership Team

Favorite interval workout: 6 repetitions of 500 meters of work with 1:45 rest, making each interval faster than the one before.
Variations: Choose to do 4 or 5 of these intervals, and you can opt to extend the rest length to 2 minutes.
Benefits: This is a classic interval workout that prepares you well for the 2000 meter race.

Peter, Concept2 Team: Engineering (and co-founder)

Favorite interval workout: 500m, 1 minute rest, 1000m, 2 minute rest, 1500m, 3 minute rest, 1000m, 2 minute rest, 500m, 1 minute rest, 250m. Go at your 2k target pace for the first three intervals, then faster for the last three.
Benefits: This is good preparation for a 2000 meter race because it helps you get familiar with your race pace on the way up the pyramid, and then pushes your intensity limits on the way back down. It’s also a great one to do when you don’t feel like working out.

Judy, Concept2 Team: Marketing

Favorite interval workout: 4 x 4 minutes with 2 minutes rest. Do the first interval at about 80% effort until you get to the last 30 seconds, then up the intensity. Start at 85% for the next two intervals, again increasing the intensity in the last 30 seconds. On the last one, start at 85% and build the intensity through the last minute.
Variations: Start with just three intervals, and increase to five or six if you can.
Benefits: These are very effective at building aerobic capacity.

CrossFit Tabata Intervals

The Tabata interval workout gets its name from Tzumi Tabata who demonstrated its effectiveness in 1996. His study compared two 6-week workout regimens:

  • An hour of steady moderate work five times a week.
  • 7–8 repetitions of a 20 second work interval at very high intensity followed by 10 seconds of rest, also five days per week.

He found that the interval workout resulted in a greater improvement in the VO2max, a key measure of aerobic fitness—14% vs. 9.5%. Moreover, the interval workout also improved anaerobic capacity by a very significant 28%, while the steady work had no measurable effect.

The bottom line: Tabata intervals are a very time-efficient way to get a terrific workout. On those days when you don’t have time to work out, try a quick round of Tabatas. You can set them up as a Favorite on your PM. Just be sure to get a solid warm-up before you start.

Note: We thank the CrossFit community for introducing us to the power of Tabata intervals. Tabatas are a key component of the CrossFit regimen. For more information about CrossFit, visit crossfit.com.

Rowing for the Visually Impaired

The Concept2 RowErgs, the Concept2 SkiErg and the Concept2 BikeErg are all terrific training options for visually impaired athletes. They offer safe and challenging fitness activities, and they provide a great way to train for rowing, skiing and other sports. Thanks to indoor racing, they also provide an opportunity for competition.

Accessibility

The following software and applications are available for use with Concept2 RowErgs, BikeErgs and SkiErgs to voice your performance data during your workouts.

ErgData

Designed to run on iOS and Android devices, ErgData is a free application that provides additional statistics, stores and displays your workout results, and uploads your workouts to the Concept2 Online Logbook. If you are running iOS 7, ErgData will work with the VoiceOver features on your iOS device to announce your workout data. When running ErgData with a PM5, the PM5 connects to your device wirelessly; running ErgData with a PM3 or PM4 requires a connection kit (available from Concept2) to connect your device. Learn more about ErgData.

Note for Android Users: ErgData voice features are available for iOS devices only. The third party app, BoatCoach offers voice features for Android devices.

Testimonials

Aerial Gilbert

Aerial Gilbert lost her sight in 1988. A guide dog and her love of rowing let her reclaim independence and the active lifestyle she'd always known.

More…

Mike Winegarden

Fitness author and creator of See Yourself Fit, Mike Winegarden is totally blind. An avid rower, Mike recommends Concept2 to all his clients.

More…

David Brown

Following a bombing that instantly blinded him, David Brown sought a sport he could do on his own. Enter indoor rowing and ErgChatter, which changed his life.

More…

Damper Setting 101

Damper Setting is…

SkiErg DamperThe damper is the lever on the side of the flywheel housing, or fan cage, that controls how much air flows into the cage. The fan cages on our SkiErgs are numbered so you can set the damper lever to a particular value from 1–10, indicating how much air is drawn into the cage on each pull:

  • Higher damper settings allow more air into the flywheel housing. The more air, the more work it takes to spin the flywheel against the air. More air also slows the flywheel down faster on the recovery, requiring more work to accelerate it on the next pull.
  • Lower damper settings allow less air into the flywheel housing, making it easier to spin the flywheel.

Damper setting is similar to bicycle gearing: it affects how skiing feels but does not directly affect the resistance. A lower damper setting on the SkiErg is comparable to easier gears on a bike.

Damper Setting is Not…

Many people confuse damper setting with intensity level or resistance. Instead, the intensity of your workout is controlled by how much you use your core, legs and arms to move the handles—in other words, how hard you pull. This is true regardless of where the damper lever is set: the harder you pull, the more resistance you will feel. Because our SkiErgs use wind resistance (which is generated by the spinning flywheel), the faster you get the wheel spinning, the more resistance there will be.

Think about skiing on snow. Regardless of whether you are skiing in fast or slow conditions, you will need to increase your intensity and apply more force to go faster. The difference is in how it feels to go faster in different conditions. Increasing your speed in fast conditions requires you to apply your force more quickly. Increasing your speed during slow conditions also requires more force, but the speed at which you apply the force will be slower over the course of the pull.

At a damper setting of 1–4, the SkiErg feels like faster snow conditions, flats and down hills; at the higher numbers, the SkiErg feels like skiing in slow conditions or uphill. Regardless of the setting, you will need to increase your effort to increase your intensity.

Drag Factor: How True Effort is Calculated

You might be tempted to think that skiing on the highest setting will result in your best score. This is where the Performance Monitor comes in.

Between each pull, the PM measures how much your flywheel is slowing down to determine how fast or slow your “conditions” are. This rate of deceleration is called the drag factor. On your next pull, the PM uses the drag factor to determine from the speed of the flywheel how much work you are doing. In this way, your true effort is calculated regardless of damper setting. This self-calibration is what allows us to compare scores from different SkiErgs, making things like racing and the online world rankings possible.

Different SkiErgs can have different drag factor ranges. A damper setting of 3 on your home machine may feel like 4 on the machine at the gym. Differences in air temperature, elevation—even how much lint is caught in the flywheel housing—can all affect the drag factor from machine to machine. When using different machines, you may need to adjust the damper setting to achieve the drag factor and feel you prefer. See How to View Drag Factor for information on checking the drag factor on your machine.

What Damper Setting to Use

With a little experimentation, you will find the damper setting and drag factor that work best for you. We recommend starting out on a damper setting of 3 or lower. Resist setting the damper lever too high; this can exhaust your muscles before you reap the full cardiovascular benefit skiing provides. The Performance Monitor will give you immediate accurate feedback on each stroke so that you can monitor your performance and determine where you get your best results.

You can also vary your damper setting to achieve different types of workouts. In general, lower damper settings are best for aerobic workouts, while higher damper settings make skiing more of a strength workout.

Developing an Annual Training Calendar

Rowing is a great complement to training for other sports. This section shows you how to develop an annual training calendar and provides workout suggestions that incorporate rowing for general cross-training as well as in training for a specific sport.

  1. Make a list of the sports you do throughout the year and define the “Active” (or competitive) season(s) for each.
  2. Define the “Training” season for each sport by backing up three months from the active season. This is when your major training should occur. If you know from experience that you need a longer or shorter training season, adjust accordingly.
  3. Define the “Groundwork” phase by backing up five months from the training season. This phase focuses on general condition and prep work, giving you a solid base on which to build your focused training.
  4. Define the rest of the year for each sport as “Recovery.”

Refer to the examples if you need help.

Single Sport, Multiple Season Training Calendar

If you have one sport with several distinct active seasons (for example, a major competition in the spring and another in the fall), your training calendar would look like this:

Month Phase Sport
January Training Running, rowing
February
March
April Active
May Recovery
June Training
July
August
September Active
October Recovery
November Groundwork
December

Single Sport, Single Season Training Calendar

If you are training for a single sport that has a single active/competitive season that extends from April to June, for example, your training calendar will look as follows:

Month Phase Activity
January Training Triathlon, golf, paddling
February
March
April Active
May
June
July Recovery
August Groundwork
September
October
November
December

Multiple Sport, Multiple Season Training Calendar

Following is an example of a multi-sport training calendar. This example includes a regatta season in the fall, Nordic ski races through the winter, and a marathon and shorter runs during late spring and summer. The active phases are spread out; the training, groundwork, and recovery phases overlap to become cross-training for each other, with rowing acting as the common thread.

Month Rowing Phase Running Phase Nordic Skiing Phase
January Recovery Groundwork Active
February Groundwork Training
March
April Recovery
May Active Groundwork
June
July Training
August Recovery
September Groundwork
October Active Training
November Recovery
December

Training for Each Phase

  • Groundwork—Emphasize longer, steadier work. The goal is to develop a good base of general cardio conditioning and adjust your muscles to the specific motions of your sport. Include plenty of stretching, flexibility, and strengthening exercises.
  • Training—Tailor your workouts for the distance and intensity of your upcoming events. You will need to train a bit at your race pace to develop a sense of pace for your competition. Include shorter, harder work to increase your intensity level, and longer, easier work to improve endurance.
  • Active—Keep sharp and rested during this phase, and recover between events. Increase your workload if your events are fewer and further apart.
  • Recovery—This phase is about variety, fun and whatever pace feels right. Incorporate lots of stretching. Keep in tune with your sport by doing a few steady state workouts at a comfortable pace.

Sample Workouts

Before trying these workouts, please read our liability disclaimer.

Try the following workouts to train for your sport:

  • 40 minute steady state row (or 10,000m) (Groundwork and Training).
  • 40 minutes of one minute hard, one minute easy (Groundwork and Training).
  • 1-2-3-4-3-2-1 minute pyramid with 30 seconds off between pieces (Training and Active).
  • Three minutes at 18 spm (strokes per minute), two minutes at 24 spm, one minute at 28 spm. Continue cycle for 30–60 minutes (Training and Active).

Workout frequency: 2–4 times per week during the recovery phase; 1–2 times per week during the Active phase.

Duration: 30–60 minutes. Shorter for intense, speed workouts; longer for steady state aerobic workouts.

Type and intensity: Vary this between steady state, anaerobic threshold work, intense intervals and racing pieces.

Seiten