SkiErg | Page 2 | Concept2

SkiErg

The Anaerobic Threshold

The anaerobic threshold (AT) is the exertion level between aerobic and anaerobic training. The AT is the point during exercise when your body must switch from aerobic to anaerobic metabolism. The AT is a useful measure for deciding exercise intensity for training and racing in endurance sports.

During aerobic metabolism, your body creates energy by burning carbohydrates and fats in the presence of oxygen and produces carbon dioxide and water as by-products (breathing and sweating). Most of our daily activities are fueled by aerobic metabolism.

Anaerobic metabolism kicks in when exercise intensity is greatly increased, and the aerobic system can no longer keep up with the body’s energy demand. This is the point at which we cross the AT. During anaerobic metabolism, the body burns stored sugars to supply the additional energy needed, and lactic acid is produced faster than it can be metabolized. Muscle pain, burning and fatigue make anaerobic energy expenditure difficult to sustain for longer than a few minutes.

The fitter you are, the longer you can fuel your body with the aerobic system before the anaerobic system needs to take over. You can improve your aerobic efficiency—and thus raise your AT—by doing high-quality aerobic work at a level just below your current AT. Monitoring your heart rate and finding your Training Heart Rate Range (THRR) will help you determine what your current AT is.

Workouts to Raise the AT

Interval workouts are effective for raising the AT. For the best results, vary your workouts between aerobic work (where duration takes priority over high intensity), and higher-intensity intervals (where you will be just under or at your Maximum Heart Rate (MHR)). Aerobic work should comprise the largest percentage of your training. Here are a few interval workouts to try. We recommend long sub-maximal intervals, with roughly equal rest. As always, warm-up well before starting your piece:

  • 5 x 750 meters with 3 minutes rest
  • 4 x 1000 meters with 3–4 minutes rest
  • 4–5 x 5 minutes with 4 minutes rest
  • 5 x 4 minutes with 4 minutes rest

Damper Setting 101

Damper Setting is…

Setting the Indoor Rower Damper
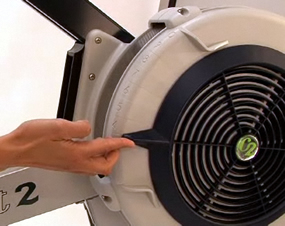
The damper is the lever on the side of the flywheel housing, or fan cage, that controls how much air flows into the cage. The fan cages on our later indoor rowers (Model C and later), are numbered so you can set the damper lever to a particular value from 1–10, indicating how much air is drawn into the cage on each stroke:

  • Higher damper settings allow more air into the flywheel housing. The more air, the more work it takes to spin the flywheel against the air. More air also slows the flywheel down faster on the recovery, requiring more work to accelerate it on the next stroke.
  • Lower damper settings allow less air into the flywheel housing, making it easier to spin the flywheel.

Damper setting is similar to bicycle gearing: it affects how rowing feels but does not directly affect the resistance. A lower damper setting on the indoor rower is comparable to easier gears on a bike.

Damper Setting is Not…

Many people confuse damper setting with intensity level or resistance. Instead, the intensity of your workout is controlled by how much you use your legs, back and arms to move the handle—in other words, how hard you pull. This is true regardless of where the damper lever is set: the harder you pull, the more resistance you will feel. Because our indoor rowers use wind resistance (which is generated by the spinning flywheel), the faster you get the wheel spinning, the more resistance there will be.

Think about rowing on the water. Regardless of whether you are rowing in a sleek racing shell, or in a big, slow row boat, you will need to increase your intensity and apply more force to make either boat go faster. The difference is in how it feels to make the different boats go fast. Making a sleek boat go fast requires you to apply your force more quickly. Making the slow boat go fast also requires more force, but the speed at which you apply the force will be slower over the course of the rowing stroke.

At a damper setting of 1–4, the indoor rower feels like a sleek racing shell; at the higher numbers, the indoor rower feels like a slow row boat. Regardless of the setting, you will need to increase your effort to increase your intensity.

Drag Factor: How True Effort is Calculated

You might be tempted to think that rowing on the highest setting will result in your best score. This is where the Performance Monitor comes in.

Between each stroke, the PM measures how much your flywheel is slowing down to determine how sleek or slow your “boat” is. This rate of deceleration is called the drag factor. On your next stroke, the PM uses the drag factor to determine from the speed of the flywheel how much work you are doing. In this way, your true effort is calculated regardless of damper setting. This self-calibration is what allows us to compare scores from different indoor rowers, making things like indoor racing and the online world rankings possible.

Different indoor rowers can have different drag factor ranges. A damper setting of 3 on your home machine may feel like 4 on the machine at the gym. Differences in air temperature, elevation—even how much lint is caught in the flywheel housing—can all affect the drag factor from machine to machine. When using different machines, you may need to adjust the damper setting to achieve the drag factor and feel you prefer. See How to View Drag Factor for information on checking the drag factor on your machine.

What Damper Setting to Use

With a little experimentation, you will find the damper setting and drag factor that work best for you. We recommend starting out on a damper setting of 3–5. Really focus on technique, and as you improve, you may find that a lower damper setting gives you the best workout and results. Resist setting the damper lever too high; this can exhaust your muscles before you reap the full cardiovascular benefit rowing provides. The Performance Monitor will give you immediate feedback on each stroke so that you can monitor your performance and determine where you get your best results.

You can also vary your damper setting to achieve different types of workouts. In general, lower damper settings are best for aerobic workouts, while higher damper settings make rowing more of a strength workout.

More on Damper Settings and Drag:
Debunking Myths: Damper Setting, Stroke Rate and Intensity
Damper Settings of Olympians

Stretching

Stretching before and after workouts may prevent injury and can make the difference between having a mediocre workout and a stellar one. Keep the following tips in mind:

  • Before you stretch, warm up by rowing lightly for 3–5 minutes.
  • While stretching, relax and be patient. Take deep, full breaths to maximize results.
  • Keep your stretches static: NO bouncing or abrupt movements.
  • Optimally complete 3–5 reps of each stretch.
  • Hold pre-workout stretches for about 10 seconds.
  • Hold post-workout stretches for up to 30 seconds.

Key Stretches

Legs

Bridge Stretch

Push into a bridge with straight legs and arms. Stretch one leg at a time.

Lower Back, Glutes, and Legs
Squat Stretch

Squat and try to get both heels on the floor.

Hamstring/Glute Hamstring and Glute Stretch

Lying on your back, bend one knee up to your chest and hug it. Then, extend your leg toward the ceiling and gently pull it to you. Repeat with the other leg.

Triceps

Behind the Head Tricep Stretch

Put one arm behind your head as shown. Grab your elbow with your other hand and pull gently. Repeat on the other side.

Calf and Achilles

Calf and Achilles Stretch

Stand about three feet from a wall with your hands resting on the wall.
Alternating feet, place each foot as far back as you can while keeping your heel flat on the floor. No bouncing and don’t overdo it; the goal is to gently stretch your calf.

Standing Hamstring Stretch Standing Hamstring Stretch

Place your leg on a chair or bench and straighten it. Keeping your back straight, lean forward until you feel the stretch in your hamstring. To increase the stretch, use a higher chair/bench. Repeat on the other side.

Lying Hamstring Stretch Lying Hamstring Stretch

Lie on your back. One leg at a time, bend your knee, then extend your leg toward the ceiling. Grasp your leg and gently pull it toward you. To ease strain on your lower back, bend the leg you are not stretching, placing your foot flat on the floor.

Variation: If it is difficult for you to grasp your leg with your hands, place a towel or strap around your leg and use that to gently pull your leg toward you.

Quadriceps

Quadricep Stretch

Standing arms-length from a wall, face the wall and place your left hand on it. Bend your right leg until you can grab your foot with your right hand. Gently pull your leg up against your glutes to stretch the top of your right thigh. Repeat on the other side.

Sitting Hamstring Stretch

Modified Hurdler Stretch

Sit on the floor with one leg out to the side and the other leg bent to the inside. Gently reach for your toes on the outstretched leg. Repeat on the other side.

Variation: Sit on the floor in the “hurdler’s position” (one leg out and one leg bent back) and reach to your toes with both arms. Repeat with the other leg.

SkiErg Performance Series

Kikkan Randall
Kikkan Randall, 2012 World Cup Overall Sprint CHAMPION

The SkiErg Performance Series aims to provide coaches and athletes with a new tool for evaluating the effectiveness of their training. Regular testing is not a new idea but testing in controlled conditions has been difficult, and testing with a ski-specific device has been impossible in the past. The SkiErg, with its accurate Performance Monitor, makes both of these training tools possible.

The other important aspect of the SkiErg is that scores can be compared from one machine to another, at any altitude, in any conditions. Athletes can now compare their performances with others around the world.

Training on the SkiErg may not be exactly like skiing on snow—but it’s a good approximation, and good enough to provide useful data and a measure of a skier’s potential performance.

The SkiErg Performance Series is designed to span the dryland training season, starting in May when skiers get back to serious training, and ending in November when races begin on snow. There are intermediate testing periods in July and September to inform training along the way.

Test Periods

The test may be performed at any time during the month.

  • Post-season: May 1–31
  • Early summer: July 1–31
  • End of summer: September 1–30
  • Pre-season: November 1–30

Test Distances

The same distances are used every month so coaches and athletes can track progress.

  • Speed/Power: 30 seconds
  • Sprint: 1000m
  • Distance: 2000m
  • Distance: 5000m

Skiers and coaches are encouraged to submit scores for each of the distances in each of the four testing periods, to best monitor training progress. However, it is also fine to submit scores for selected distances and testing periods.

How to Participate

  1. Set up a free online logbook at concept2.com/logbook.
  2. Sign up for the Series on the Challenges page of your Logbook.
  3. Ski the desired distances during the testing period.
  4. Enter results into your online logbook by the end of the month.

Times are automatically added to the Results Board for the given testing period. If the athlete repeats the test within the testing period, the fastest result will show on the Results Board.

Results Boards are archived on the Concept2 website, so that coaches and athletes can refer back to them as needed.

Individual Marathon

The goal: To row or ski 42,195 meters in one workout. It is a category in our Online Ranking along with the half-marathon of 21,097 meters. For preparation and training information go to Training for a Marathon.

Each person rowing or skiing a full marathon will be awarded one free marathon pin per ranking year (May 1–April 30; Schweiz participants only).

When you've completed your marathon, enter it in your Online Logbook, and then visit the Challenges page to download a certificate and request your pin.

Questions? Email [concept2:marathon-email].

Regulations and Recommendations

We recommend that at least one support person be present throughout the marathon attempt. This person can keep a log of your meters completed at intervals and will serve as your witness. This person is also helpful if you need extra water, and so on.

Drink fluids at least every half hour and rest as often as you need to. We suggest a minimum break of several minutes each hour. Just keep the following in mind:

  • Any rest time will be added to your total time.
  • PMs are programmed to shut down after a couple of minutes of inactivity during a workout. To prevent your monitor from shutting down mid-marathon, either keep your breaks short, or keep the monitor active by pressing Units or Change Units regularly before you resume the piece.

Set your monitor for a 42,195 meter distance workout. For more information on how to do so, visit Performance Monitor in our Service section.

Good luck!


Marathon Pin
Marathon Pin

First Workouts

Once you’re comfortable with technique on the SkiErg, gradually begin increasing the duration and intensity of your workouts. Here are workouts to try. We recommend doing them in the order listed.

Before trying these workouts, please read our liability disclaimer.

Workout 1

Resist the temptation to ski for too long the first time on the machine—we recommend starting with no more than 3–5 minutes at a time. We also recommend starting with the double-pole technique as it uses more muscle groups and gives you a great overall workout. After 3–5 minutes, take a break to stretch and walk around. If you feel good, do up to four of these short intervals of skiing.

Workout 2

Begin experimenting with cadence and power. Cadence is displayed in strokes per minute (spm) in the upper right corner of the Performance Monitor. Power is how hard you are pulling. It is displayed in a choice of units in the central display area: watts, calories, or pace. Try some 3 minute intervals of skiing, varying your cadence and pace, as described below.

  • 3 minutes at 35 spm, comfortable effort; 1 min rest
  • 3 minutes at 37 spm, harder effort; 1 min rest
  • 3 minutes at 39 spm comfortable; 1 min rest
  • 3 minutes at 41 spm, harder effort; 3 min rest
  • End with 10 minutes of steady state skiing at your choice of power and stroke rate. Make note of what pace you settle on, because you will use it in your next workout.

Workout 3

This workout introduces longer skiing with cadence variation.

  • Do four 5 minutes pieces, varying the cadence rate as noted below. Try to ski at a pace that is a faster than your 10 minute pace from Workout 2.
    • 35 spm for the first 2 minutes
    • 38 spm for the next 2 minutes
    • 41 spm for the last minute
    • Rest: ski very easily for 2 minutes before starting the next 5 minute piece.

Workout 4

This workout focuses on longer, steady skiing.

  • Do two 10 minute pieces with 3 minutes rest in between. Try to go a little faster than you did for the 10 minute piece in Workout 2. Your stroke rate should be between 35–41 spm.

Workout 5

This workout features short intervals for variety. This is the workout to see how fast a pace you can achieve.

  • Ski 1 minute hard, 1 minute easy for a total of 20 minutes. Watch the central display for your pace. Aim for a cadence of 39–45 spm. Record your pace after the workout using the recall/memory function on the Performance Monitor.

Benchmark Piece

Once you complete Workout 5, do a benchmark piece of 30 minutes nonstop. Record your total meters, and repeat this workout every few weeks to see how you are progressing. You can also enter it in the Concept2 Online Ranking!

Next Steps

Now that you’ve completed the first few workouts, begin building an exercise plan that works for your schedule and goals. Visit our Workout of the Day page for ideas.

Getting Started

SkiErg
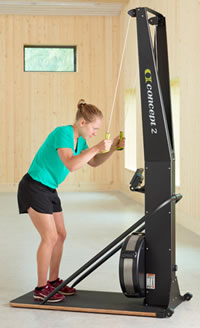
The SkiErg is easy to use. Once you know the basics, you’ll be well on your way to reaching your fitness goals. Use the tips and resources in this section to make the most of your SkiErg.

Learn Proper Technique

Before your first workout, take the time to watch our technique video and visit the technique page. Learning proper technique from the start will help you ski better and faster in the long run. It will also help prevent injury and keep you from developing bad technique habits that are difficult to break.

Educate Yourself

Become familiar with what the damper setting does and how it controls how your skiing feels.

Track Your Progress

Monitoring your progress is one of the best ways to stay motivated and achieve your goals. We recommend signing up for our Online Logbook, where you can record all your workouts, participate in the many challenges offered throughout the year, and keep track of your progress if you’re working towards one of the Million Meter Clubs. If you prefer paper, call or email us to request our paper logbook or download a logbook page and print it.

Train with a Partner

Finding a workout partner can make a huge difference in sticking to a new routine. You can use the Training Partner feature of our online logbook to keep track of their progress, no matter where they live.

Build Up Gradually

When you first use the SkiErg, resist the temptation to do too much too soon. Instead, make sure you focus on your technique and learn to maintain a steady pace. Follow our First Workouts to get you started.

Seiten